Note
Access to this page requires authorization. You can try signing in or changing directories.
Access to this page requires authorization. You can try changing directories.
Note
This article applies to the Copilot Studio web experience. To create a chatbot in the Microsoft Copilot Studio app for Microsoft Teams, see Quickstart: Create a chatbot in Teams and deploy it.
Copilot Studio empowers teams to quickly and easily create powerful agents using a guided, no-code graphical experience without needing data scientists or developers.
This quickstart shows you how to create an agent for the first time. Learn how to:
- Add knowledge to your agent.
- Test content changes in real time.
- Publish your agent to a demo website you can share with others.
Create an agent
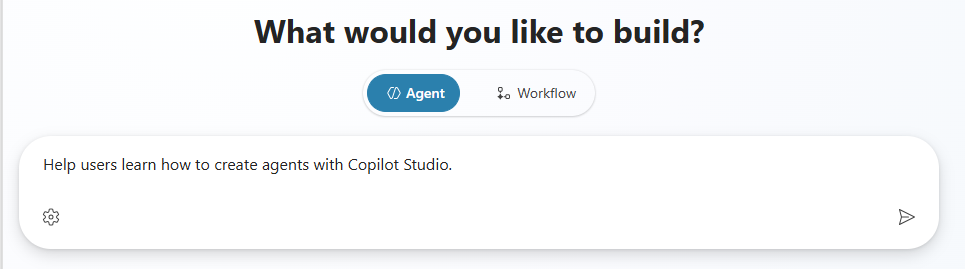
When you create an agent, you can describe what you want your agent to do in your own words.
The example scenario in this quickstart creates an agent called Friendly Tutor to help users learn about Copilot Studio based on knowledge from the official Copilot Studio documentation.
Sign in to Copilot Studio, or sign up. You land on the Home page.

Note
If you don't see the box prompting you to describe what your agent needs to do, your environment doesn't support agent creation with natural language. Go to Create an agent for more options.
Optionally, change the primary language, solution, and schema name for your agent.
Enter a brief description of what you want your agent to do—for example, "Help users learn how to create agents with Copilot Studio." The description can have up to 1,024 characters.
The Overview page for your agent appears.

Once Copilot Studio finishes provisioning your agent, configure your agent's basic features.


Edit your agent's basics
Once your agent is created, you can change its name, description, and instructions. You can add triggers, knowledge sources, tools, and suggested prompts. Remember to test your changes as you go!
For this example scenario, in the Details section, select Edit, rename your agent "Friendly Tutor," then select Save. The maximum length for the name is 42 characters.
If desired, in the Instruction section, select Edit, refine the instructions Copilot Studio generated for your agent, then select Save.
Keep the instructions simple for now. Just make sure you include information about what your agent helps users do. For example, specify the conversation style and tone your agent should use: "Friendly Tutor should talk to users like a kind, patient teacher." The instructions can have up to 8,000 characters.
Add knowledge to your agent, if desired. For Friendly Tutor, add the official Copilot Studio documentation as a knowledge source:
- In the Knowledge section, select Add knowledge.
- In Add knowledge, select Public websites.
- In Add public websites, enter
https://v4.hkg1.meaqua.org/microsoft-copilot-studio, select Add, then select Add to agent.
Improve your agent
Now that you have an agent, you can test how changing your agent's instructions affects its behavior and improve it.
Test changes to your agent
The best way to improve your agent? Test it. Make some changes. Test it again. Repeat.
In this section, you test how changing your agent's knowledge sources affects how your agent responds to users.
Start by testing how your agent currently responds in the test chat. Ask your agent a question. For example, ask: "How do I add a knowledge source?"

In this example, the agent's instructions are to talk to users like a kind, patient teacher. What if you give your agent different instructions?
Go to the Overview page, and update the instructions for your agent to use a different tone, like talk to users like Jane Austen.
Test your agent's new instructions with another question. How has the response changed?
Change your agent's introduction
Help your agent make a great first impression with a new introductory message. This message lets users know what your agent does and encourages them to interact with your agent.
In the Test your agent chat, select your agent's introductory message. The Conversation Start topic opens, and the Message node for your introductory message is in focus.
Tip
If you can't see the introductory message in the test panel, select the Start new test session
 icon at the top of the panel to restart the conversation.
On the Message node, select the text of the message.

Replace the default message with your own. In the introductory message, your agent should greet users, tell them what it does, and how to start interacting with it. You can also give users an example question or prompt.
For Friendly Tutor, update the introductory message to say:
Hello, I'm here to help you learn how to use Microsoft Copilot Studio. You can ask me all about agents: "What is an agent?" "How do I make an agent?" "How do agents work?"
Select Save.
To test this change, select the Start new test session
icon at the top of the Test your agent chat panel.
Suggest ways of starting conversations
If your agent is meant to be used in Teams or Microsoft 365, you can configure up to six suggested prompts customers can choose from to start a conversation with the agent.
To add or update suggested prompts:
On the Overview page, go to the Suggested prompts section ad select Add suggested prompts (if you don't have any suggested prompts yet) or the Edit
 icon.
icon.Revise or add titles and prompts, as desired, and select Save when you're done.
Note
Suggested prompts are meant for Teams and Microsoft 365 Copilot Chat. They appear on the agent's welcome page, before you start a new chat. You can't see or use them when you test your agent in Copilot Studio. Learn more about configuring suggested prompts.
Make your agent unique with a distinctive icon
Select the agent icon in the top bar.
Select Change icon.
Choose an image from your device. The image file must be in PNG format and less than 72 KB in size, with a maximum resolution of 192 × 192 pixels.
Select Save.
Publish your agent
Once you're happy with your agent, you can publish it to a live or demo website. Since this step depends on the platforms and channels you have access to, go to Key concepts - Publish and deploy your agent and Publish an agent to a live or demo website for more information.
Note
You might need to change the authentication for your demo website, depending on who you want to access your agent. Go to Key concepts - Publish and deploy your agent for information on authentication levels and how to change them.
At the top of the page, select Publish, and then select Publish again in the Publish this agent confirmation message. If the publish is successful, you see a green banner on the top of the page.
At the top of the page, select the More icon (…) and select Go to demo website.

Send the URL to others to demonstrate it.
For more information about publishing your agent to other channels, see Key concepts - Publish and deploy your agent.
What's next?
You created an agent, tested it out, and published it to a demo site. Congratulations! Your agent has many more capabilities, so try it out and play with the advanced features.
For questions not covered in the documentation or for feature ideas, visit our community and post questions.
We'd love to hear your ideas on Copilot Studio. Visit our Ideas board and post your ideas.